


heey that mutton looks big. What did it weigh?
Posts by Dan
-
-
To buy Dermestid beetles.
http://www.dermestidbeetlecolonies.com/
Some good info from http://cmsc.minotstateu.edu/museum/dermestidcolony.html
QuoteDisplay More[FONT=Arial,Helvetica,Geneva,Swiss,SunSans-Regular][SIZE=+1]


Dermestid beetles belong to the family Dermestidae, also called carpet beetles or larder beetles. These beetles are commonly used by museums and taxidermists to prepare skeletal material. The CMSC has been operating a colony for the past five years, cleaning everything from a full emu skeleton, to brown bats, shrews, and everything else in between. the following are some hints and suggestions in order to keep a colony in operation.[/SIZE][/FONT]
[FONT=Arial,Helvetica,Geneva,Swiss,SunSans-Regular][SIZE=+1]1) GET A GOOD HOUSING! You do not want any "escapees" out of your colony. Although they are harmless to you and I, they are extremely damaging to any type of dried animal material, such as taxidermy mounts and natural history collections. Insect collections are renowned for attracting dermestid infestation. If you have ever made an insect collection as a child, then slid it in a drawer or under your bed and came back to it a year later and found nothing but dust in the bottom, thank dermestids! They are a museum pest, and must be handled appropriately if you are in the vicinity of anything you do not want damaged. We have fabricated a container from 3/4 inch plexiglass salvaged from hockey rinks. the lid is especially designed to fit in a stairstep fashion with the box to eliminate any chance for exit. Crawling up the sides is eliminated due to the depth of the box and the slippery nature of the plexiglass, as long as its kept clean. I have never noticed a larvae or adult any higher than an inch up the side. when a specimen is complete all obvious beetles are shaken off and the specimen is immediately frozen to kill any hidden passengers.
[/SIZE][/FONT] [FONT=Arial,Helvetica,Geneva,Swiss,SunSans-Regular][SIZE=+1]A ventilation hole is put directly in the middle of the lid and covered with mesh. Adult dermstids can fly, although I rarely see one flying in the colony, so it is important to keep an eye on your colony any time you have the lid off. [/SIZE][/FONT]
[FONT=Arial,Helvetica,Geneva,Swiss,SunSans-Regular][SIZE=+1]It is possible to use other containers for colony housings. Aquariums are usually the first considered, but you need to have a good fitting lid fabricated out of Plexiglass, and the dermestids will, over long periods, damage silicon joints commonly used to hold glass together. My suggestion would be to find a non-working dorm fridge turned on its back or small chest freezer. Cut a vent hole in the door and screen it. You then have a container with a good sealing lid and a fairly slippery inside. If you want more information about, or cost of Plexiglass colony fabrication, contact me at hanley@minotstateu.edu[/SIZE][/FONT]
[FONT=Arial,Helvetica,Geneva,Swiss,SunSans-Regular][SIZE=+1]
2) keep the colony dry. If your colony gets too wet, little white mites will begin to appear, and will take over your colony. This has happened only once to our colony, and although the mites do not harm the dermestids themselves, they irritate the dermestids to the point that they will stop feeding. we now keep our colony very dry, and lightly mist any material in the colony perhaps once a day. [/SIZE][/FONT]
[FONT=Arial,Helvetica,Geneva,Swiss,SunSans-Regular][SIZE=+1]
3) You dont need anything in the colony except for cardboard! I have read alot of forum posts about providing cotton, or logs, or woodchips, or all manner of other "bedding" material. Throw all of that stuff away. cut corregated cardboard into pieces (4 inch by 4 inch approx) and throw them around in the bottom of the colony. Thats all they need! in the colony pictured here I put in maybe 20-25 pieces. The cardboard provides something for the larvae to burrow into to pupate, and also acts as a moisture absorbing material. When the cardboard starts looking raggy and floppy, take it out and put fresh pieces in. I clean out perhaps 80 percent of the frass from this colony twice a year. if the frass looks damp, your colony is heading for trouble.[/SIZE][/FONT]
[FONT=Arial,Helvetica,Geneva,Swiss,SunSans-Regular][SIZE=+1]
4) Dry your specimens! Dermestids do not feed well on rotting meat, and the colony can begin to stink very badly, so I have found it important to dry out any material that is being introduced into the colony. I skin the specimen, remove all large portions of meat, remove the eyes and brains from larger specimens as they will rot before the bugs can get to them, and then I put the specimen in a fume hood overnight to dry it to the consistancy of what I compare to soft bite beef jerky. I suspect you could do the same thing by putting it in front of a fan in a dry climate. After some experimenting you begin to get a feel for how the dermestids like it. I prefer to have them on the dry side, and if I notice the dermestids taking longer than expected, I'll begin lightly misting the specimen in the colony, perhaps once a day. Don't overdo it, a little mist goes a long way.[/SIZE][/FONT]
[FONT=Arial,Helvetica,Geneva,Swiss,SunSans-Regular][SIZE=+1]
5) Keep the colony warm. Dermestids, like most insects, are active in temperatures above 60 degrees F, and the colony works the best in temps around 70 to 80 degrees F. Dermestids will go through periods of slower activity, especially if you are bringing the colony indoors and outdoors with the seasons. [/SIZE][/FONT][FONT=Arial,Helvetica,Geneva,Swiss,SunSans-Regular][SIZE=+1]6) Don't get discouraged! Once you get a good colony going it almost takes care of itself. It will take many months from acquiring your beetles until the time you can prepare larger specimens, so start small. Run something the size of jackrabbit skulls for the first couple of weeks. As your colony grows it will be able to complete larger specimens in reasonable time frames. I prepped an entire emu skeleton, piece by piece, in about a month, elk skulls in two or three weeks, small songbirds overnight! I usually have two or three small specimens along with something bigger going at the same time. Be aware that the success of the colony will run in cycles. Some weeks you will not be able to put specimens in fast enough, and other times it will slow down for no apparent reason. Be patient![/SIZE][/FONT]
-
I feel stupid, I've already attempted to do this a few years ago and now forgot what I learned. But I'll leave this thread up so someone can save themselves the trouble in the future.
The boiling does the job quickly. The skin starts coming off immediately. The problem is that a lot of the flesh is now also cooked and ants will not eat it. So now you're committed to boiling everything off, and that's where the main problem comes in. The idea is to get rid of all flesh otherwise the thing will rot. But if you boil to the point of all the flesh coming off, so does whatever is holding the bones together. You're left with many pieces which will need to be glued together after being cleaned. There is no one main piece even if you stick to the bare minimum necessary to represent the skull well. Even the jaws are hinged along a center line and will require gluing. You'll need a lot of time and a good memory of that particular fish's anatomy. I just wanted a quick souvenir, not to invest hours and hours in such a thing. If you must have a fish skull I recommend you buy it. I have a hard time believing the skull people are selling actual skulls. There's just too much labor involved. I also got cut a few times from the Cuda teeth.
Just to take some value from the experience, it was interesting to see the quantity of meat in the head, I always throw away cuda heads, and marvel again at the cuda's double mouth. My dogs were eating fish as I was moving along. There's a disgusting mess outside now which I really don't look forward to cleaning tomorrow morning.
-
Read carefully and you'll be posting pics like a champ in no time, so simple even a hau can do it <img src= " height="23" srcset="https://spearfishing.world/forum/images/smilies/emojione/1f606@2x.png 2x"> http://spearfishing.world/foru…ure-posting-tutorial.html
LB, do you think this thread would be better titled "Making a polespear grip"?
-
Thanks for the detailed answer Bill.
Is poured epoxy no longer in style?
I've made a couple of simple wood enclosed track guns, with Davie cutting the track. On one speargun the track chipped near the front but it's not a big deal. Otherwise the guns work fine.
-
It is boiling as we speak. It's eerie to have that huge mean looking head staring at me from a pot. In the even that it does come out good, is there such a thing as clear epoxy in spray form?
-
pffft.. I'll go boil it now.
-
It's a good move. I've been thinking of going in that direction myself. This is my first attempt <img src= " height="23" srcset="https://spearfishing.world/forum/images/smilies/emojione/1f606@2x.png 2x">
Edit - Pic removed.
-
Has anyone had success with removing the skin and flesh from a fish head to end up with a clean skull? A few years ago I tried leaving the head in water, the flesh came off but the bones separated, it was too much hassle to glue them together in the correct order. I'm thinking of boiling the head but I'm afraid the same thing will happen. Leaving the head for ants to clean leaves skin on.
-
You should be able to, it's youtube. Try clicking the link on top of the video.
-
Interesting tinu, thanks. I guess Sporasub used to be a division of Mares for this very reason. Ironic how a people that embraced world domination and genocide only 65 years ago, have now become so caring.
-
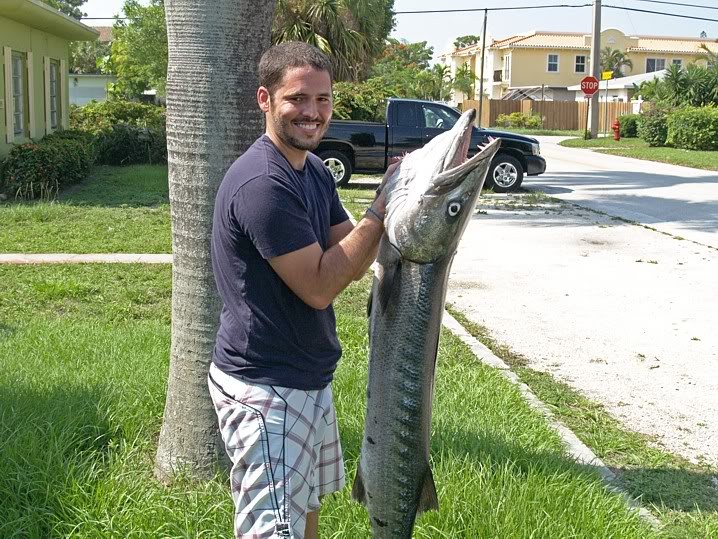
Larry popped in today on his way back from a beach dive. Stone shot on this hefty 35lb cuda!

-
That's surprising. Spearfishing originated in Europe. I'm under the impression that spearfishing competitions are well publicized events there, and the good spearos are regarded as sports celebrities.
-
O2, what is "trying to be p.c."?
That's some cool music, does anyone know the name of the artist and song?
Never mind, the information is right there with the video.
QuoteSound track: "Memories", music by Klaus Waldeck, lyrics by Eva Schwaerzler-Engel
-
Nice thread LB.
Why does it need to be copper wire?
-
What is this guy wearing on his head?
Beautiful red snapper.

-
Are those the new bands?
What diameter is the shaft?
It looks like a short gun to me. I'd do all kinds of things to it. First I'd see if it can take a 7mm shaft. If so I'd make it open muzzle and use a shaft with sharkfin tabs. Change the bands. Shorten the butt. Then I'd probably throw it away and it will end up looking like this


-
Thanks Jeff

-
Epic indeed!
QuoteVis was probably 50-60 feet, blue with a slight tint of blue down deeper.
LOL
I'm stunned that you put a camera on your gun. Nice vid, lots of stone shots.
-
Yes. It also links to information about why roller guns were conceived in the first place. Had to do with a law that would forbid more than one rubber band on a speargun http://rocknfish.com/Multi-bandSpearguns.html