Posts by Guest

    My sanity is fragile enough already! I actually went back to the original pics before I remembered who I'm dealing with! In this case, "pressed" would indeed be "hammered". My vise wouldn't quite open wide enough. I suppose the more accurate term would be "interference" fit.


    I wonder if one possibility might be a line guide that attaches with one of the four attachment screws for the spike? Sold separately, of course . . .

    It's is a press fit, with the drilled hole in the plastic 0.015" smaller than the outside diameter of the stainless rod. This was to eliminate the need for any additional pins, threads, etc. to hold the spike in place. If you look carefully in the most recent pics, you will see a tiny vent hole in the back of the plastic to vent the trapped air from the hole while I insert the rod. I tried to remove the rod from the very first prototype that I made, to re-use it in one of my first three "production" versions, and ended up having to slice the Delrin completely away to remove it.

    That's certainly one option, but as we've said before, "Everything is a compromise." :D


    For example, if I weld it to the spike, then will that present any problems for someone who wants to rotate the spike to one side? The extra material would be trivial, but it also makes assembly considerably more time consuming ($$), and adds another failure point that does not presently exist. As always, a balance between cost and function. Maybe I could do it as an option, if requested?

    You have a point there. It is also possible to mount the spike off center, instead of directly under the gun, if that would help. I was hoping that rotating it about 45° to the left would generally keep it away from the shooting line, without adversely affecting the balance of the gun too badly, but I hadn't thought about people running the line through the guide.


    I will have to think a bit on how a line guide could be added to the spike.

    I just mailed these to a few eager testers yesterday, so hopefully I will get some installed pictures back in a couple days. I went with flat bottomed "counterbored" screw holes, instead of the standard countersink design, as added insurance that tightening the screws won't crack the Delrin. I forgot to weigh one, but calculated weight of the stainless spike is 45g, so the whole thing probably weighs in the neigborhood of 60g (about 2 oz.) in air.


    There is a pretty good correlation between hardness, and ultimate tensile strength. A hand-held hardness tester could then be used as a portable and non-destructive way to compare shafts. Pricey though.


    Here's the problem with simply applying a weight between two centers. All normal steels, at least within the range we're talking about, have nearly the same "modulus of elasticity". That means that they will stretch (or bend) about the same amount under a given load. Spring steels, however, will allow you to continue adding more load and will bend FURTHER before they yield and take a permanent set.


    If you want to measure the stress at which a metal will yield, you have to pull it harder and harder and note the point at which it gives.

    Sorry that they were difficult to install at first, but I like your solution. Was the belt getting hung up because of the thickness, or the width? By that, I mean did you have the edges tapered like this:


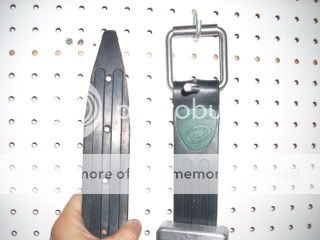
    If not, then that's obviously easy to fix. You are right in that it is almost impossible to thread the weights if the belt does not protrude through the slot enough to get a good grip. If you were finding that your belt was too thick for the weight slot, then I need to adjust the dimension to better accomodate the RA belt. I check every weight to make sure that it fits easily on my RA belt, but this makes me wonder if maybe the thickness of the belts varies somewhat from one to the other?


    One other thing that I should mention for anyone else who may have trouble. It is very hard to hold the weight in one hand and pull the belt through with the other. It works much easier if you put the belt on the floor. Step on the buckle end, and pull the free end to stretch the belt. THEN slide the weight. You probably already figured that out, but it isn't always obvious to someone else just looking at the pictures.

    I think you're right about the spike needing to be shorter. It's always easy to cut more off, so I started with it a little longer than where I thought it would end up.


    The JBL has larger diameter tube than other railguns that I have seen. The JBL tube is 1.25" OD, whereas most euro guns seem to be 28mm (about 1.10") OD. It's not for me anyway. A few people have inquired about wanting one for their RA guns, so that is what I am specifically interested in. You have a good point about moving the plug, though. If the plug can be driven just a little further down the barrel, then the attachment problem goes away. I would probably use a piece of plastic instead of a wooden dowel, but the same concept.

    Dan proposed the idea of a kill spike for railguns to me quite a while back, and I finally got around to building a quick prototype. What's missing, obviously, are the mounting holes to attach it to the muzzle end of the tube. Since I don't even own this type of gun, I need a little advice.


    What is the internal plug made of? How long is it? If the attachment screws penetrated the aluminum tube and tapped into the watertight plug, would this cause a problem? Is the plug made out of a hard plastic or other material that might even help hold the screws? Is there enough room between the inside of the muzzle, and the watertight plug, to use nuts or some other piece inside the tube for the screws to bite into?


    I would like to use two mounting screws on each side. Possibly the forward ones would tap into the part of the muzzle which is inside the tube. The rear screws would be in the barrel plug area, if possible.


    Thanks for any thoughts.


    Hmmm. I don't think that it's case hardened. When I welded the tab on Dan's shaft, the heat burned the coating and left a chalky yellowish residue. I have welded hardened gears before, and they left no such residue, presumably because case hardening infuses such a small amount of carbon, nitrogen, or whatever, that there isn't enough to burn and produce any noticeable residue. Case hardening also would provide no corrosion protection.

    Ok, then I retract my statement. Perhaps the new coating is some form of galvanizing. But I doubt it.


    Dan - Very common in my line of work to take relatively soft piece of steel which is tough and resistant to cracking, and then coat it with something very hard to prevent wear. Chrome is one such coating, as is Boron Nitride (the gold coating on some drill bits). And increasingly, ceramics.