Kill spike for euro spearguns

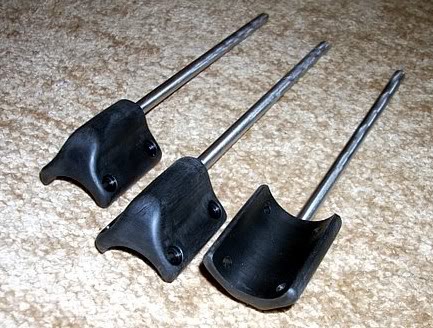
  • Dan proposed the idea of a kill spike for railguns to me quite a while back, and I finally got around to building a quick prototype. What's missing, obviously, are the mounting holes to attach it to the muzzle end of the tube. Since I don't even own this type of gun, I need a little advice.


    What is the internal plug made of? How long is it? If the attachment screws penetrated the aluminum tube and tapped into the watertight plug, would this cause a problem? Is the plug made out of a hard plastic or other material that might even help hold the screws? Is there enough room between the inside of the muzzle, and the watertight plug, to use nuts or some other piece inside the tube for the screws to bite into?


    I would like to use two mounting screws on each side. Possibly the forward ones would tap into the part of the muzzle which is inside the tube. The rear screws would be in the barrel plug area, if possible.


    Thanks for any thoughts.


  • Nice work.


    Don't you have a JBL you can try it on? I think the JBLs are not watertight anyways. A wood dowel can be inserted into the barrel to hold the screws.


    I know little about how the other pipe guns are made watertight. I would try to acquire the same plug they use and just move it further down the barrel past the point where the spike would be attached. Then I would use the wood dowel.


    I think the spike should be shorter. It may be too much leverage from a hard poke for the plastic to hold it. But then you know your plastics.

  • I think you're right about the spike needing to be shorter. It's always easy to cut more off, so I started with it a little longer than where I thought it would end up.


    The JBL has larger diameter tube than other railguns that I have seen. The JBL tube is 1.25" OD, whereas most euro guns seem to be 28mm (about 1.10") OD. It's not for me anyway. A few people have inquired about wanting one for their RA guns, so that is what I am specifically interested in. You have a good point about moving the plug, though. If the plug can be driven just a little further down the barrel, then the attachment problem goes away. I would probably use a piece of plastic instead of a wooden dowel, but the same concept.

  • I just mailed these to a few eager testers yesterday, so hopefully I will get some installed pictures back in a couple days. I went with flat bottomed "counterbored" screw holes, instead of the standard countersink design, as added insurance that tightening the screws won't crack the Delrin. I forgot to weigh one, but calculated weight of the stainless spike is 45g, so the whole thing probably weighs in the neigborhood of 60g (about 2 oz.) in air.


  • Doesn't the spike interfere with the line guide?


    Some people run their reel line through the guide so the spike will obstruct. Maybe you can add a optional line guide on the unit either on the spike or on the delrin.

    Davie Peguero

  • You have a point there. It is also possible to mount the spike off center, instead of directly under the gun, if that would help. I was hoping that rotating it about 45° to the left would generally keep it away from the shooting line, without adversely affecting the balance of the gun too badly, but I hadn't thought about people running the line through the guide.


    I will have to think a bit on how a line guide could be added to the spike.

  • That's certainly one option, but as we've said before, "Everything is a compromise." :D


    For example, if I weld it to the spike, then will that present any problems for someone who wants to rotate the spike to one side? The extra material would be trivial, but it also makes assembly considerably more time consuming ($$), and adds another failure point that does not presently exist. As always, a balance between cost and function. Maybe I could do it as an option, if requested?

  • It's is a press fit, with the drilled hole in the plastic 0.015" smaller than the outside diameter of the stainless rod. This was to eliminate the need for any additional pins, threads, etc. to hold the spike in place. If you look carefully in the most recent pics, you will see a tiny vent hole in the back of the plastic to vent the trapped air from the hole while I insert the rod. I tried to remove the rod from the very first prototype that I made, to re-use it in one of my first three "production" versions, and ended up having to slice the Delrin completely away to remove it.

  • Are you :crazy: there is no hole :confused1:


    Well that eliminates the possibility for the user to switch between spikes, one that would have a line guide welded on and one without.


    When you say it was a press fit did you actually use a press to do it or did you hammer it in then sharpen the point?

  • My sanity is fragile enough already! I actually went back to the original pics before I remembered who I'm dealing with! In this case, "pressed" would indeed be "hammered". My vise wouldn't quite open wide enough. I suppose the more accurate term would be "interference" fit.


    I wonder if one possibility might be a line guide that attaches with one of the four attachment screws for the spike? Sold separately, of course . . .

  • If it were just for me, that is exactly what I would do. But there is a lot more machining time in a muzzle, and I could never duplicate some of the three dimensional craziness of some designs. Making these is pretty straightforward, and this approach gives people the flexibility to use whichever open or closed muzzle they like best. At least that was my thinking, but feel free to challenge it.

  • Here's a few pics of the spike installed as designed. The first thing that comes to my mind is that it's probably a little longer than needed as a shark poker. The length could be nice, I guess, for subduing a holed up fish, but that is pure speculation on my part since I don't have that type of bottom. It's tough (but fun) to design and build something for a type of diving that you have never done, and to fit a gun that you have never used and don't even have in your possession!


  • Looks very nice and clean. Could be a little shorter to decrease the leverage on the attachment point but that should be easy to correct if desired. I'm curious as to which gun it's on and what were the installation details. I'm glad you enjoyed the design and fabrication process, on to the next challenge :)

Create an account or sign in to comment

You need to be a member to leave a comment.