
Hey Ron, glad you made it over here buddy!!!
Posts by rich vandusen
-
-
Awesome work once again Zach!!!
:thumbsup2:
-
Ben, It was great meeting you and drinking your beer at 11:30 Friday night.
You got a sweet one-of-a-kind H-Gun, and it was a pleasure seeing you smile when Phil handed it to you.(it was even better seeing that you posted pictures of it at 1:30 a.m Saturday after finishing rigging it)

-
Coming along nicely. I'm looking forward to seeing more pics as you go.....
-
Welcome troutbum, abalone and ling season isn't too far off.
As for suits, get a good 7mm 2-piece open cell freedive suit and you won't be cold up in our 48 degree Nor Cal waters. I'm using a 7mm Spetton right now, but I've read good things about the Pursuit wetsuits, and the price is awesome at $240.
http://freedivingspearfishinggear.com/5-a -
Welcome bro, glad you found your way in.
-
Welcome from yet another Nor Cal brother.
-
Nice vid, and nice shooting!!
-
That's looking good man. You're going to have a dead fish hanging off that thing very soon!!
-
Very handy addition for us DIY guys
-
I can't recommend a particular shop down in So Cal since I'm from the Sacramento area. I did however get my open water cert back in 2002 before I started hunting and freediving. I also took the Nitrox class a couple years later, but open water is about all you really need if you think you'll enjoy blowing bubbles. The rest of the classes like advanced o.w. and u.w. hunting are kind of b.s., and those things will come naturally with more experience (and for free). If you just want to be in the ocean for the seafood bonus, I'd recommend getting a good open-cell wetsuit, a low voulme mask and j-snorkel, some decent longblade fins, and just skipping the scuba certification all together (unless you just like spending money).
I haven't had a tank on my back in over 3 years, and I don't really miss it. It tends to be more restrictive with all the equipment you have to wear, and the anual maintainance gets to be a bit spendy once you own all that gear. I went to my shop last year to have the wife's and my regulator and b.c. inflator serviced and they wanted almost $400. Screw that, I'd rather get a nice new speargun for that price. Also, some fish tend to be a little spooky around all that bubble noise that scuba makes in the water, so getting close enough to shoot them can be next to impossible. Shore access in California can also be a bit more difficult with all that scuba shit. Up in Nor Cal we often times have to scramble down sketchy little trails or rapell down ropes to get to the good hunting grounds, and full scuba gear makes that absolutely impossible. Once you get down the cliff and swim around in the ocean for a couple hours, you still have to drag all that gear AND your dead fish back up the hill to the car, and you're usually pretty cold and exhausted by then.
Freediving is just better for hunting and you'll learn better form and technique by starting there, than by flopping around in the water with a tank on your back.
-

How much overhang did you allow, i always thought that the recommended overhang was 10-14 inches or is that different on a smaller gun.
That epoxy finish looks fantastic, and you did an awesome job of polishing the stainless, what do you use to polish it?
Jono
Thanks Jono, the shaft only has just enough overhang for the flopper to close, maybe 5 inches. More of a personal preference for me. Even on my larger guns I like the shaft overhang as little as possible.
Phil's epoxy is amazing stuff to work with. It really lets the beauty of the wood grain shine through!!
For stainless steel polishing I started with 120 grit sandpaper and worked up to 400 grit. Then I used a buffing wheel with a metal polishing compound, and a final buff on a dry wheel. -
ya more angle and further forward ,may tear your bands where it is
philToo late now, it's epoxied in place :angry5:
Unlike the line pins on my other guns, I stuck it behind the band hole because there wasn't enough meat toward the front of the muzzle.
Maybe I'll give it a little tweak forward and downward so it doesn't snag the band.
Thanks for the input guys :thumbsup2: -
I shaped the muzzle mostly with hand tools and sandpaper, with a little Dremel action on the band slot. Once I got it the shape I was going for, I brushed on 4 coats of Herranen epoxy. In between waiting for coats of epoxy to dry I ground and polished all the stainless hardware to a mirror shine. When I went to put the gun back together I still had to clean epoxy out of the mounting holes for the hardware, but it went pretty quick, and I'm stoked with the way the gun turned out. These pics don't show it, but I also epoxied on a butt pad from a piece of flip flop sandle.
-

Hi could you put a pic of you table saw? I have the same but I see that you have another fence? Pics Please.
The saw uses the factory fence. I just bolted a strip of wood to the fence so it's a little taller. I also built the router table to bolt up between the saw rails since floorspace in my garage is limited, and the router fence just clamps to the table saw fence. I made some removable tables that attach to the saw rails on the out-feed side of the saw and router table for doing spearguns. Pretty simple and cheap wood working setup, but it's definately effective when I need it.
-
I'm so looking forward to this trip!!!!
-
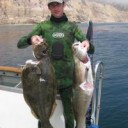
Rich, is the ab body really as black as it appears in the pic?
Yeah, they actually look pretty disgusting when we grab them, but all the black parts get trimmed off and the meat inside is nice and white. I don't usually eat the black parts (or "lips" as we call them in Nor Cal ;)), but some people like to grind them up and stew them into a tasty chowder.
Here's a link to a good article on step-by-step trimming and preparation of the foot of the snail:
http://diver.net/seahunt/abalone/abalone.htm -
Thanks Jeff, but you and Bill are at the top of my short list of creative genius when it comes to new ideas and clever application. I certainly didn't come up with that handle concept on my own, I merely made the idea work with the materials I had available to me at the time. I'd love to have a TIG welder to fabricate some of these things, but right now all I have is a JB welder

Now for the fun stuff.....
I live in Northern California, and as divers, we're very fortunate to have an abundant population of red abalone available for the taking. I've used the mother of pearl from the shells on other guns as cover-ups for lead ballast, but this gun's getting a little something purely for decoration. Yummmm, tasty snails
I've seen a few guys making very nice inlays from manufactured sheets of "abalam", and other types of man-made pearl veneers, but since I have a pile of empty ab shells laying around in the back yard, I wanted to put them to good use.
Safety disclaimer: abalone shell is toxic; wear eye protection, and a respirator rated for asbestos exposure when working with the shells, and if possible, wet-cut to minimize dust.
I slabbed them out with a diamond wheel and shaved them down to a uniform thickness on a belt sander. The shells are bowl shaped, so getting flat usable pieces is a bit of a headache. It took about 7 shells to get enough slabs for the small inlay I did. I found a picture of a lingcod that I liked and traced it onto clear mylar, then transfered the parts of the fish onto the shell blanks with carbon paper. I used a tiny diamond burr in a rotary tool to cut out the 7 individual puzzle pieces and 400 grit paper to fine tune the fit. All the pieces were assembled onto blue masking tape, then I scored the outline onto the wood with an X-Acto knife on the bottom of the gun just ahead of the trigger guard.
The plunge router attachment Dremel makes is a little sloppy, and my Craftsman knock-off doesn't fit into it anyway, so I made my own router base with some bolts and scrap wood. I set the depth of the bit to the thickness of the inlay and routered out the bulk of the wood waste, then cleaned up the recess with the X-Acto. I little epoxy and some sanding finished it off nicely.
-

Very nice handiwork, there, Rich. What kind of wood is the stock, and what size/ number of bands do you plan to use?
Thank you. The stock was laminated Tigerwood (Goncalo alves) and I'm planning to use 1 band, either 9/16" or 5/8", depending on how well it shoots.
I drilled the hole just below the deep open track, then used my tapering jig to shave off the bottom near the muzzle (somewhere around 3/16"), and also both sides just a hair (maybe 1/8").
-

Does anybody have any experience doing it the other way around - i.e. the loop is of a thinner cord material, and the wishbone is thicker?
I don't recall what size dacron I used in this picture, but the loop is 600 lb. spectra. The dacron wishbone is about 2X the thickness of the spectra. I got the materials from Phil H., maybe he'll chime in.