I like the zip tie best for this kind of installation because of the concern that the larger screw holes weaken the blade. I don't believe Pursuit carbon blades are going to break because of the screw holes, but I prefer to be on the safe side. With a zip tie I'm able to get away with two tiny slots, which I use a dremel and small carbide milling bit to make, instead of two large screw holes which have the potential to start a crack. I also feel that the head of the screw puts too much concentrated pressure on the blade unnecessarily. The zip tie is softer and the pressure is more evenly distributed. The weight of the plate and 2 screws is insignificant but I like knowing that it's not there. Also the plate and two screws nowadays cost extra, they're not included in the price of footpockets. If your toes protrude past the front opening of the footpocket they will be pushed up slightly by the screw mounting plate, I like the feeling of more space under my toes when the plate is not there. When you have well made footpocket tendons, specifically the T slot inside, and well designed tendon rails, it goes a long way to secure the blades in the footpockets. The tendons grip the rails very well. But the zip tie assures the blades will not come out even if the tendons come off the rails accidentally.
The H Dessault footpocket tendons open very wide to accept the rails and can be simply clipped on. But not all footpockets are like that, some are harder to get the rails into, and some are harder to get the blades all the way back into the footpocket. Because of this I've adopted a procedure which I use for all footpocket installations. I simply rub dishwasher detergent on the rails and on the back of the blade. I spread the tendons out sideways and insert the back of the blade as far as in as it will go. I hold the footpocket upside down between my legs sitting down which allows me to use both hands to push the blade in. Now I snap the tendons over the rails. Then I check that the blade is aligned, that one side is not deeper in the footpocket than the other. It's easy to make small adjustments because of the detergent. Once the blade is aligned I move to making the slots.
Holding the blade and footpocket together I use a dremel with a small carbide milling bit to make an initial hole in the blade right through each of the footpocket screw holes. Make sure that you drill each hole tight against the wall of the footpocket hole that is closer to the center of the footpocket. This way when the zip tie will run through it it will be supported by the rubber of the footpocket not just the blade material. I then turn the blade over and use the Dremel to extend the hole I just drilled in both directions to make a slot. The slot will be just as wide as the zip tie. Pull the zip tie as tight as you can. I then trim the zip tie flush with the knob. Future disassemble is very easy, just pinch the knob of the zip tie, you don't even need to cut it.
The last step is I take the fin outside and use a garden hose to wash all the detergent out of it. It's at this point that the tendons really grip the rails. The whole thing takes 10 minutes.
One more small detail about installation. If I'm reasonably sure that the footpocket/blade combination is permanent I put a very small drop of instant glue on the small rails of each side top and bottom right where the tendons end. Squeeze the tendons hard pushing them against the rails for a few seconds. The bond is permanent. If you'll need to take out the blades at a later time you'll have to cut through the bond losing a thin layer of footpocket tendon or rail in the process. But gluing the tendons like that makes the blade very solid, it will never reposition itself in the footpocket again.
Video: Carbon Blades Installation
Disclaimer: If you don't like the way I'm installing the blades and think that the slots weaken them, then by all means put together the fins the way you prefer. Pursuit carbon blades are in no way set up to only be secured with zip ties. The well designed tendon rails are an advantage compared to other blades on the market, and from there you can proceed with glue if you want. If you're buying complete carbon fins from us you can have your choice of installation with zip ties, or mounted in the footpockets only. We will not install with screws, and will only glue blades in footpockets that were designed specifically to have blades glued in, such as Pathos foopockets.
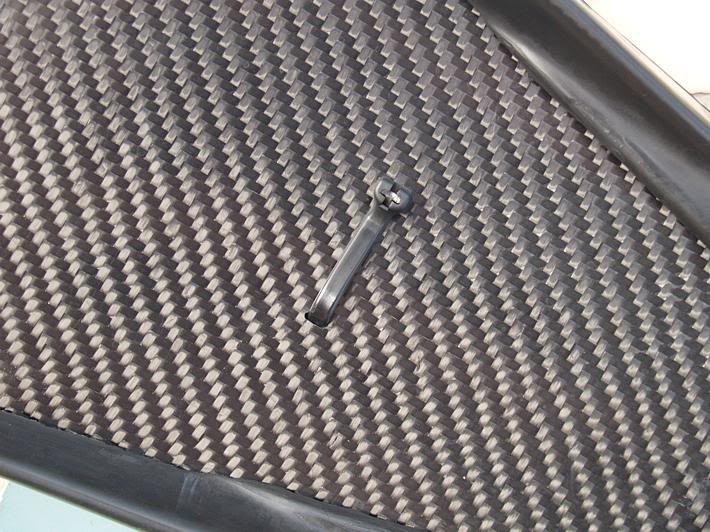
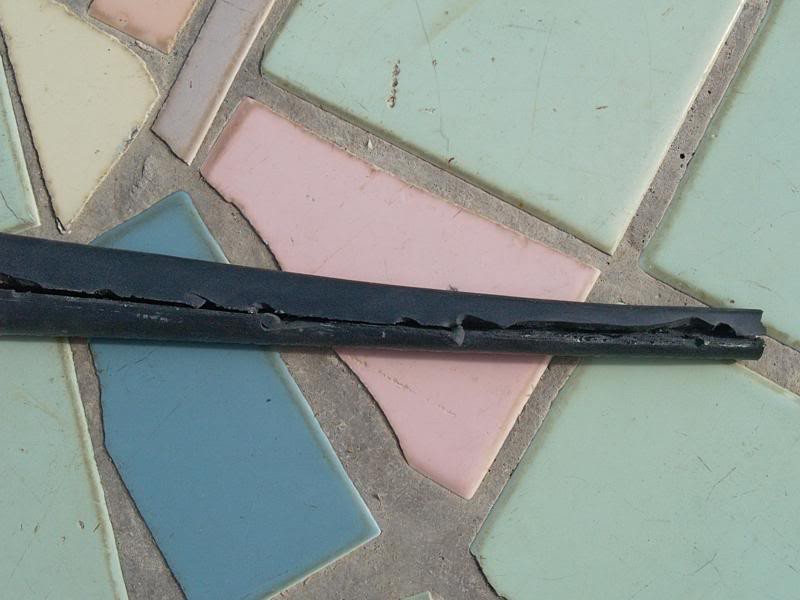
Here's a pic of what the installation with a zip tie looks like. Note that the slot is just wide enough to accommodate the zip tie. It runs length wise so the stresses experienced by the blade that normally run width wise can't act on it as a point of weakness. If the hole was round as it would be if a drill bit was used then the weakness would be the same width wise as length wise. Also the slot is made with a milling bit which means it was ground as opposed to cut, this versus another method of making a hole and the fact that the carbon is bi-directional makes it less likely that a crack will develop from that point.